Proxmox VE is a capable hypervisor, but the gap between “backups configured” and “backups that work when recovery is needed” is where most incidents originate.
This guide covers the full proxmox backup vm workflow: the three native backup modes and when to use each, how to schedule auto backup in Proxmox, where Proxmox VM backup files are stored, how to back up all Proxmox VMs at once, how to connect backup jobs to NAS storage, and where incremental backup fits in. We also cover where native tools hit their limits and what enterprise teams use instead.
See how Zmanda Pro simplifies this
Three Proxmox VM Backup Modes: How to Choose the Right One
Proxmox VE ships with vzdump, a built-in backup utility for KVM/QEMU virtual machines and LXC containers. Every backup job requires a mode selection, and that choice determines consistency, production impact, and suitability for the workload type running inside the VM.
| Mode | How It Works | Consistency | Production Safe? | Best For |
|---|---|---|---|---|
| Stop | Shuts down VM before backup; restarts after completion | Highest — clean state, no in-flight writes | No — causes downtime | Dev/test, non-critical workloads |
| Suspend | Suspends VM, snapshots memory to disk, resumes after | High — memory state preserved | Limited — brief freeze | VMs requiring memory-state preservation |
| Snapshot | Disk snapshot while VM continues running | Good — filesystem-consistent with QEMU guest agent | Yes | Production VMs requiring continuous uptime |
The critical condition for snapshot mode: the QEMU guest agent must be installed and actively running inside the VM. Without it, Proxmox still takes a snapshot, but filesystem quiescence is not guaranteed. For MySQL, PostgreSQL, or any transactional application running inside the VM, a crash-consistent snapshot can appear valid but fail on restore. Install the agent before relying on snapshot mode for any database workload.
Not sure when to use this? See Proxmox Backup vs Snapshot: Which One Actually Protects Your VMs?.
Backing Up a Single Proxmox VM: Web UI and CLI
For single-VM backup through the web interface: navigate to the node, select the VM by ID, open the Backup tab, and click Backup Now. Select storage target, backup mode, and compression type, then confirm. The task log streams output in real time and the completed backup file appears in the storage location immediately.
For CLI-managed environments, vzdump is the native tool:
vzdump 100 --storage local --mode snapshot --compress zstdTo write to a specific directory instead of a named storage target:
vzdump 100 --dumpdir /mnt/backup/vms --mode snapshotThe --compress flag accepts zstd (recommended for speed-to-ratio balance), lzo, or gzip. For most environments, zstd delivers 40–60% compression on mixed VM workloads with minimal CPU overhead and a meaningful reduction in NAS storage consumption over time.
If you’re new to PBS, start with Proxmox Backup Server: The Complete Guide for IT Teams.
How to Configure Auto Backup in Proxmox
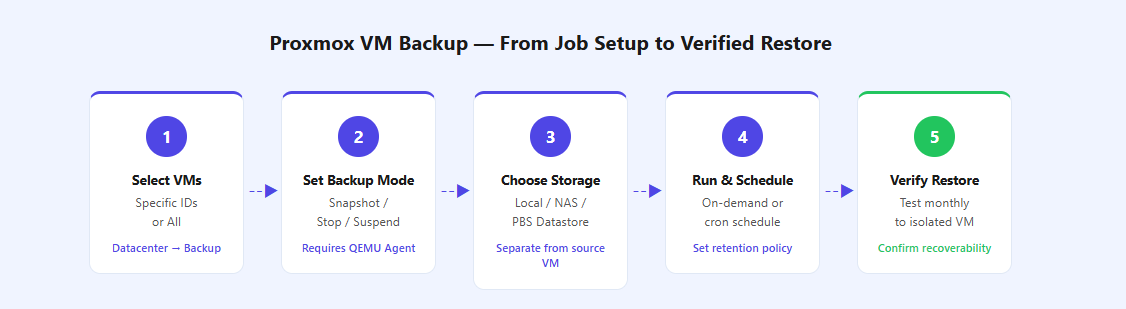
The Proxmox scheduler lives at Datacenter → Backup → Add. Each job defines: which VMs to include (specific IDs or All), storage target, backup mode, cron-style schedule, and retention policy. Once configured, jobs run automatically without manual intervention.
Common proxmox backup schedule patterns for production environments:
- Daily at 2:00 AM (
0 2 * * *): Standard for production VMs with a 24-hour RPO. Most common pattern across SMB and mid-market deployments. - Every 6 hours (
0 */6 * * *): Targets a 6-hour RPO for critical systems. Requires sufficient storage for 4× daily backups per VM. - Weekly on Sunday (
0 0 * * 0): Appropriate for dev/test VMs with low change rates.
Retention is set within the same job. A production baseline: 7 daily, 4 weekly, 3 monthly. Always configure retention; without it, backups accumulate until storage fills and the next scheduled job fails silently. For environments with 20+ VMs, stagger start times by 5–10 minutes per batch to smooth I/O load across the backup window.
How to Back Up All Proxmox VMs at Once
The --all flag covers every VM and LXC container on the node in one command:
vzdump --all --storage backup-storage --mode snapshot --compress zstdTo exclude specific VMIDs:
vzdump --all --exclude 101,102 --storage backup-storage --mode snapshotFrom the web UI, the Datacenter → Backup scheduler includes an All scope option that automatically covers every workload on the selected node. For multi-node clusters, create a backup job per node or centralize all nodes to a Proxmox Backup Server instance that serves as a single storage target.
Monitor total job duration against your backup window when running all-VM jobs. A cluster with 30 VMs averaging 300 GB each needs to move approximately 9 TB per full backup cycle. At 80 MB/s real-world throughput over 1 GbE, that exceeds 28 hours, well outside most practical windows. This is the primary driver for adopting Proxmox Backup Server’s incremental architecture or an enterprise platform for larger deployments.
Proxmox VM Backup Location: Where Your Files Live
The proxmox vm backup location is determined by the storage target configured under Datacenter → Storage. Files created by vzdump follow this naming format:
vzdump-qemu-{VMID}-{YYYY_MM_DD}-{HH_MM_SS}.vma.zstFor LXC containers, the prefix changes to vzdump-lxc-. Common storage configurations:
- Local directory:
/var/lib/vz/dump/by default. Simple but shares disk with the OS and VM images, not appropriate for production use. - NFS-mounted NAS: A NAS share defined as a Proxmox storage location. Most common for SMB and mid-market environments with existing NAS infrastructure.
- PBS datastore: Backups stored as deduplicated chunks. Not accessible as single files but fully recoverable through the PBS or PVE interface.
Non-negotiable: backup storage must be physically separate from the source VM disk. A backup on the same drive as the VM it protects fails with that drive.
Backing Up Proxmox VMs to NAS
NAS-backed backup is the most common proxmox backup vm to nas pattern for small-to-mid enterprise environments. Configuration follows three steps: create an NFS or SMB share on the NAS, add it as a storage target in Proxmox under Datacenter → Storage → Add → NFS (or CIFS), then target that storage in backup job configuration.
For Synology NAS: ensure NFS export permissions allow the Proxmox node’s IP with root squash disabled or mapped to a backup user with write access. Root squash enabled is the most common cause of permission denied errors during vzdump write operations. For TrueNAS: configure dataset permissions to allow NFS write access from the Proxmox node’s IP. Use a dedicated dataset for VM backups; mixing backup data with other NAS data makes capacity management and retention enforcement difficult.
Network bandwidth is the binding constraint. A 1 GbE connection delivers roughly 80–90 MB/s real-world throughput. A dedicated backup VLAN with 10 GbE is recommended for environments exceeding 20 VMs or 5 TB of source data. For centralized NFS backup management across workloads beyond Proxmox, Zmanda Pro’s NFS and iSCSI backup support provides unified control without per-node manual configuration overhead.
Proxmox Backup Incremental: Why Full Backups Hit a Wall
Native vzdump produces full backups by default. A 300 GB VM creates roughly 120–180 GB per backup after compression. With 30-day daily retention, that’s 3.6–5.4 TB of storage per VM. Scale across 20 VMs and the math becomes difficult to sustain without a significant NAS investment.
Proxmox Backup Server (PBS) introduces true proxmox backup incremental architecture via change block tracking (CBT). After an initial full backup, subsequent jobs transfer only changed blocks, typically 3–10% of VM size per day. PBS deduplication on mixed VM workloads typically achieves 2:1 to 5:1, making it substantially more efficient than raw vzdump-to-NFS for any environment running recurring backup jobs.
For hardware sizing guidance before deploying PBS, see the Proxmox Backup Server requirements guide.
For teams requiring greater efficiency, Zmanda Pro extends this with client-side deduplication before data leaves the source, achieving up to 90% storage reduction in production at scale, validated across 2,600+ sites for a large US franchisee operator. Zmanda Pro supports Proxmox VE natively with agentless snapshot-based VM backup and cross-platform restore to Proxmox, Hyper-V, or VMware. It also supports forever-incremental architectures without periodic full backup resets, which is critical for large environments with tight storage budgets.
When Native Proxmox Backup Is Not Enough
Native tools handle small environments reliably. The operational gaps emerge as VM count, node count, and compliance requirements grow:
- No centralized multi-node management. Each Proxmox cluster runs independent backup configurations. Ten clusters means ten separate job lists, no single pane of glass for backup health across the environment.
- No automated failure alerting. A 2:00 AM backup failure produces a log entry, not a notification. Teams find out when they check logs, potentially days after the failure, eliminating recovery options.
- Mutable backup storage. Backups written to NFS or local disk can be overwritten or deleted by ransomware, misconfiguration, or admin error. There is no protection layer by default.
- No compliance documentation. Native tools generate no audit trails, no policy enforcement reports, and no evidence for HIPAA, SOC 2, or PCI DSS auditors.
Zmanda Pro addresses the full gap list: centralized multi-cluster management, automated failure alerting, immutable backup storage that survives ransomware attacks, direct-to-cloud offsite copies, and compliance-ready reporting from a single console. For teams following the 3-2-1 backup framework, Zmanda manages all three copies: local, secondary, and offsite, without separate per-node configurations.
For the full landscape of Proxmox backup architecture, from native tools to enterprise platforms, the complete Proxmox Backup Server guide covers every layer.