Zmanda is undoubtedly a globally recognized provider of the leading open-source backup and recovery software, Zmanda Enterprise. Our software provides our clients with the easiest of tools for customization and setting up an economical backup in a jiffy. We here at Zmanda, are thrilled to have you join the Zmanda community and are honored to have your trust invested in us.
Keeping true to our word, Zmanda provides an efficient and effortless integration of your tape libraries with the help of the Zmanda Management Console and the Zmanda AE Server.
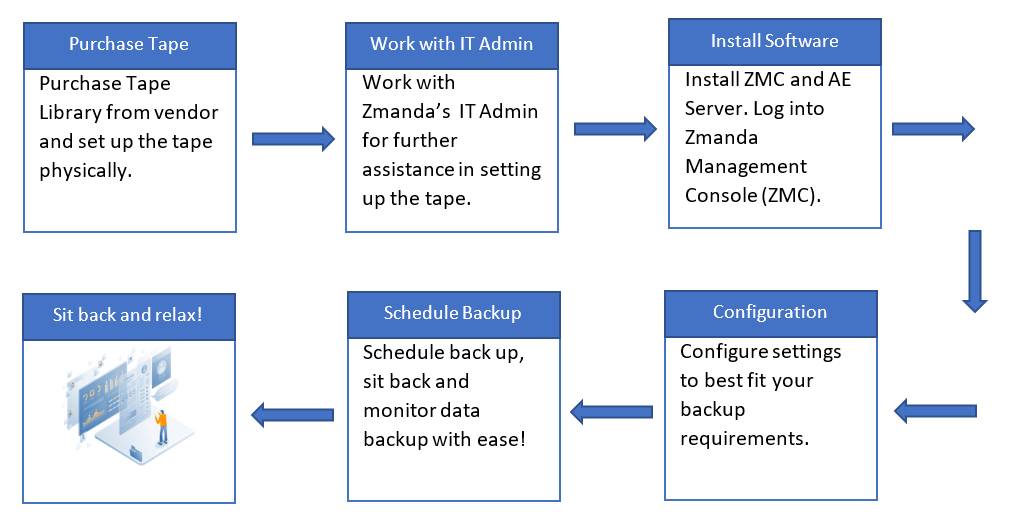
Configuring your tape library with Zmanda is a simple 5 step process:
Step 1: Purchase Tape Library from Vendor
Tape libraries can be procured at frugal prices from vendors. Zmanda has partnered with one such vendor, Spectra, offering its clients the best tape storage deals in the market. Click here to find out more.
Please note that Amanda Enterprise is now Zmanda Enterprise.

Other such popular tape storage providers include IBM, Quantum etc. On procuring tape storage from one such vendor, you can set the tape storage physically to enable access to the same through your host machine with the vendor’s aid.
Step 2: Work with our IT Admin
On purchasing a tape library, contact our IT Admin for any further assistance in helping you connect your tape storage to your machine.
Once the tape library gets connected to your system, run the below command to view the tape changers, the drives, hard disks etc that are connected to your SCSI bus.
WHAT IS SCSI?
The SCSI (Small computer system interface) is a set of standards defining the various protocols, commands, and logic employed for establishing a connection and thus data transfer between the computer and the peripheral devices. The parallel SCSI was initially developed to support hard drives and tape drives, but has now extended its utility by supporting other peripherals such as scanners, CD drives etc.
Command to view connected devices (Eg: Tape Changers):
lsscsi -g List Small Computer System Interface (lsscsi) : Lists all the devices connected the SCSI
Description: To view the list of devices/peripherals connected to the SCSI bus of the host machine.
For better understanding of the command and its respective output, below is the output of running the lssci -g command on our terminal.
Example I/O:
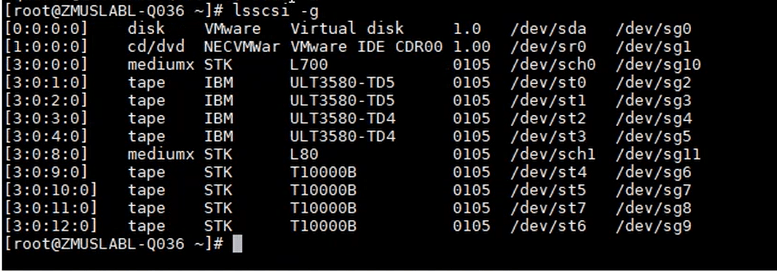
In the above given example, there are certain tape drives connected to the host via sg2, sg3 etc., and the tape changers are connected via sg10 and sg11, referred to as mediumx.
sg – The sg driver allows users to send SCSI commands to the connected devices.
Eg: sg7 refers to the sg driver 7 that permits communication between the user and the tape drive of type STK
To obtain the particulars related to the tape library, such as the status and available storage space, run the below command. As a parameter for the below command, pass /dev/sg{number} which specifies the tape changer under inspection.
What is a tape changer?
Let us use the below analogy to understand better what a tape changer is.
Physical Tape ~ Books
Storage Element ~ Bookshelves
Tape Changers ~ The action of taking a book from the shelf for borrowing it.
Tape Drives ~ Reading area.
Data Transfer Element ~ Tables in the reading area.
In a nutshell, to read or write to the the final end point of storage, the physical tape , the following steps are adhered to:
1. The tape must be taken from the storage element in which tapes are stacked, and placed on a data transfer element.
2. The data transfer elements perform the required action on the physical tape currently in its hold.
3. On completion of the read write functions, the tape is returned to its storage element.
Thus, the tape changers are used to facilitate the movement of the physical tape from one place to another.
Command to obtain information related to tape libraries:
mtx -f /dev/sg10 statusmtx: Controls single or multi-drive SCSI media changers, such as tape changers
-f: To specify the SCSI generic device corresponding to the media changer. sg10 corresponds to our host’s media changer. To find your media changer, use the lssci command as mentioned above.
status option: Displays the number of drives and storage elements contained in the device. It specifies for each tape drive whether it has media loaded on it, and if so, from which storage element slot the media is obtained.
Description: To obtain a detailed report of the available storage elements slots indicating whether they are occupied or empty, and the current status of the tape drives.
To better understand the command and its output, given below is the output obtained on running the mtx -f /dev/sg10 status command, where sg10 corresponds to our media changer.
Example I/O:
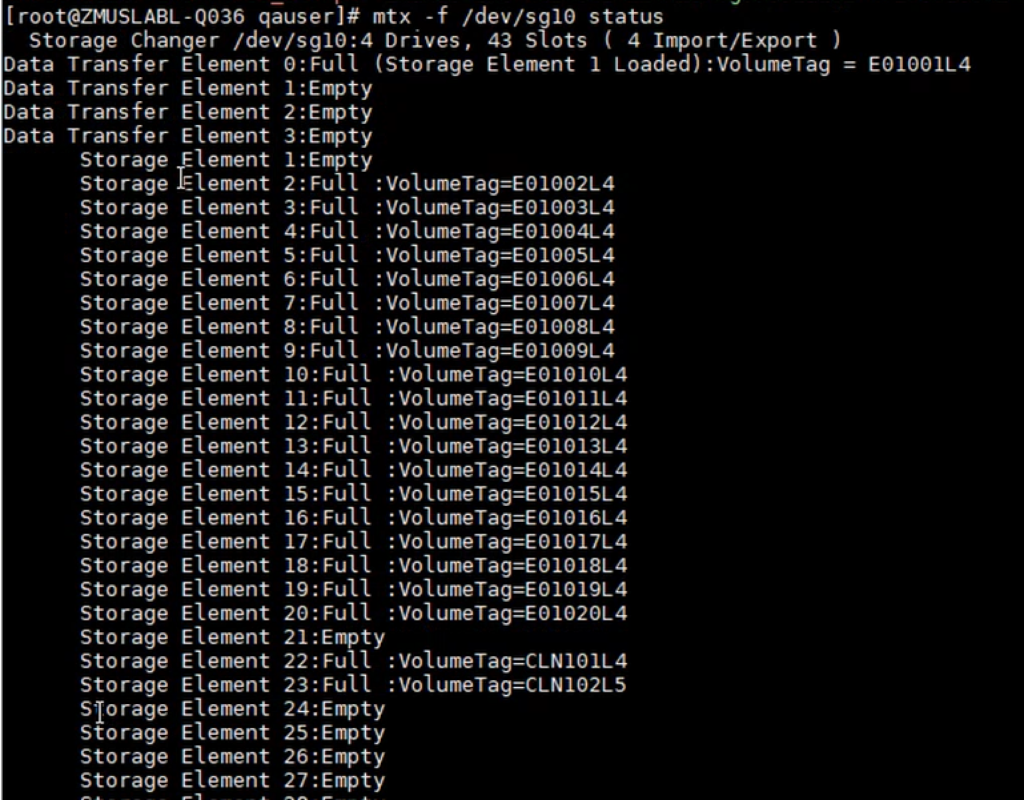
In the above example, the mtx command is performed on the /dev/sg10 tape changer. We observe that there are 4 data transfer elements (tape drives) and 43 storage elements (slots). Further, a couple of the storage elements are empty while the rest hold a physical tape such as an LTO, identified by the unique VolumeTag. We also understand that tape drive 1, the data transfer element 0, currently has the storage element 1 loaded in it. This can be confirmed as the slot in storage element 1 is found to be Empty.
Step 3: ZMC and AE Server Installation
With the tape library connected to your machine, the next step is to install the ZMC and AE binaries to access the software. There are certain rudimentary tasks that are required to be fulfilled for the installation of ZMC and AE servers.
- Prerequisites and dependencies to commence installation.
- Acquiring Licenses and Binaries.
- ZMC and AE Server Installation
Logging into ZMC
Zmanda Management Console is accessed via a web browser. The latest versions of Internet Explorer, Mozilla Firefox, and Google Chrome supports Zmanda Enterprise seamlessly.
To access the Amanda Server, use the following URL:
https://<host name of the Amanda server>:<port number>/
if you are using the default port, 8008.
Ensure that access to the default port 8008 is allowed by the existing network configuration.
(Eg: Firewalls)
The ZMC Login Page
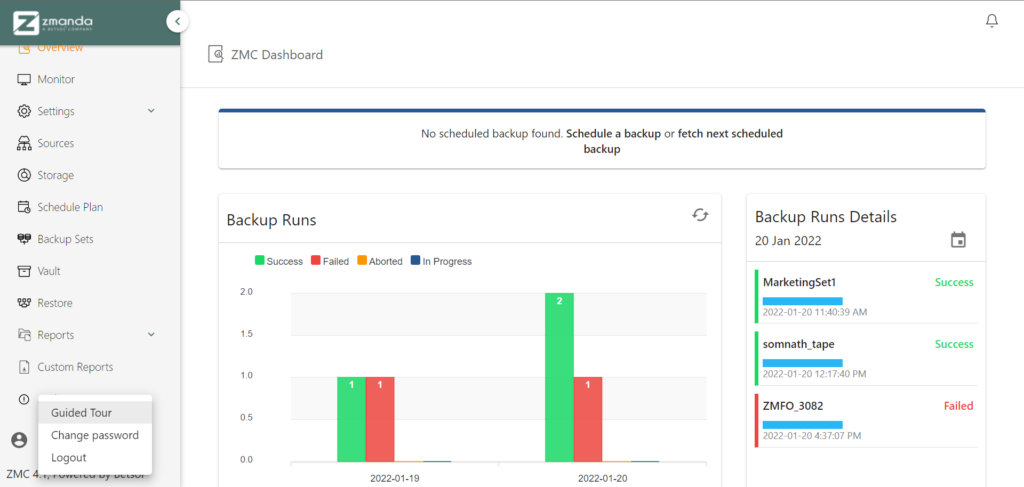
You have successfully logged into the Zmanda Management Console. The next step is to configure your backup.
Use our guided tour option by clicking on the User Icon in the bottom left corner.
Step 4: Configuring Backup to Your Tape Library
On a successful installation of ZMC and the AE Server, next in line is the configuration and customization of your tape library backup to meet requirements.
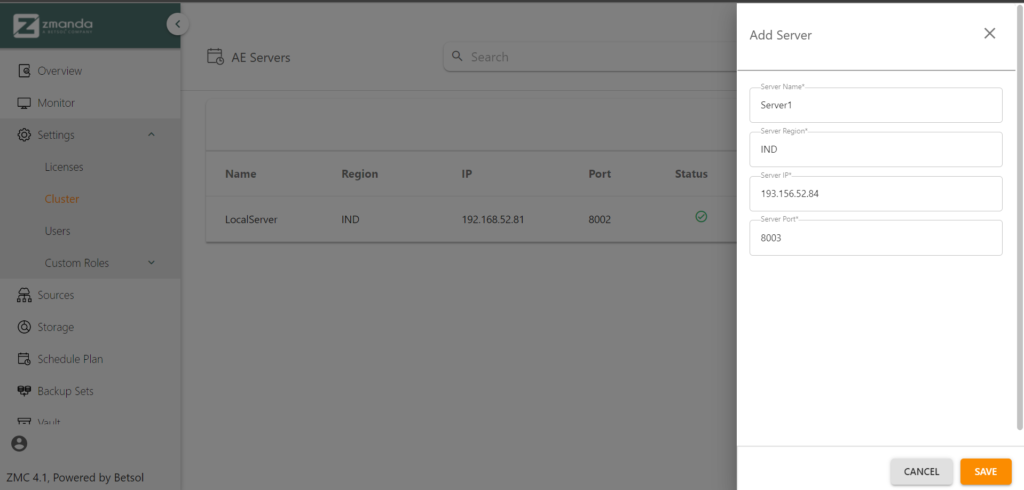
1. Creating a cluster
Zmanda allows our users to have the AE server installed on various machines, which can be connected to the ZMC located else where. Essentially, the cluster facilitates a connection between the AE server and the User Interface of the ZMC. Hence, ZMC can be used to configure multiple tape libraries that are connected to numerous AE servers across various machines.

Fill in the required information such as the server name (for personal identification), the region in which the server is present, the respective IP address and the Port number.
On establishing a successful connection, the next step is to inform ZMC of the source from which the data is to be backed up.
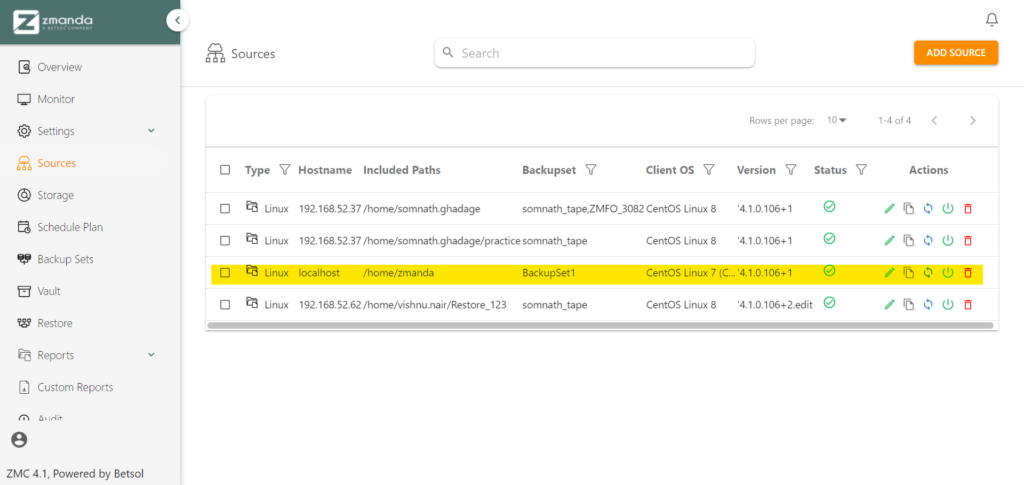
2. Adding a Source
The Sources page is used to configure with ZMC the various sources from which it retrieves the data to be backed up.

Zmanda supports all of the conventional sources of data as given below:
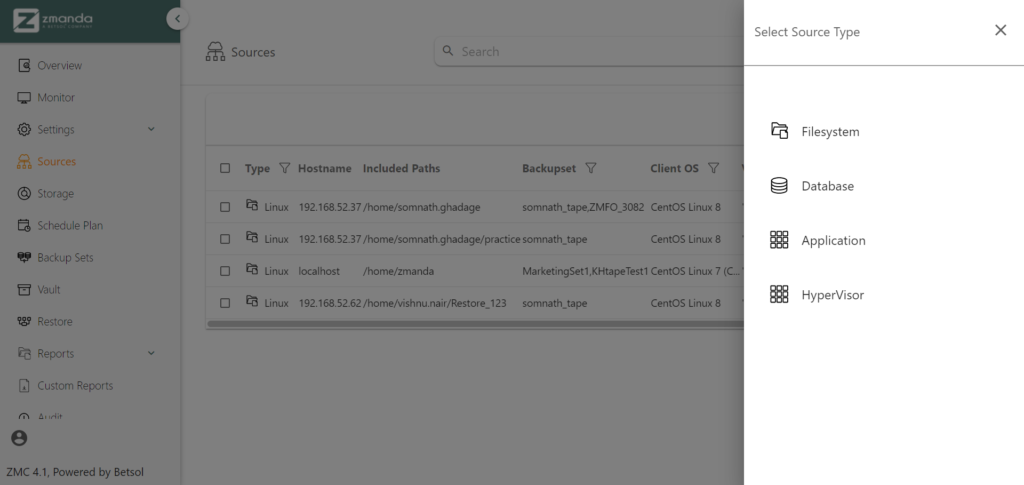
- Filesystem: A filesystem source is created if the data has to be retrieved from the server’s Operating System.
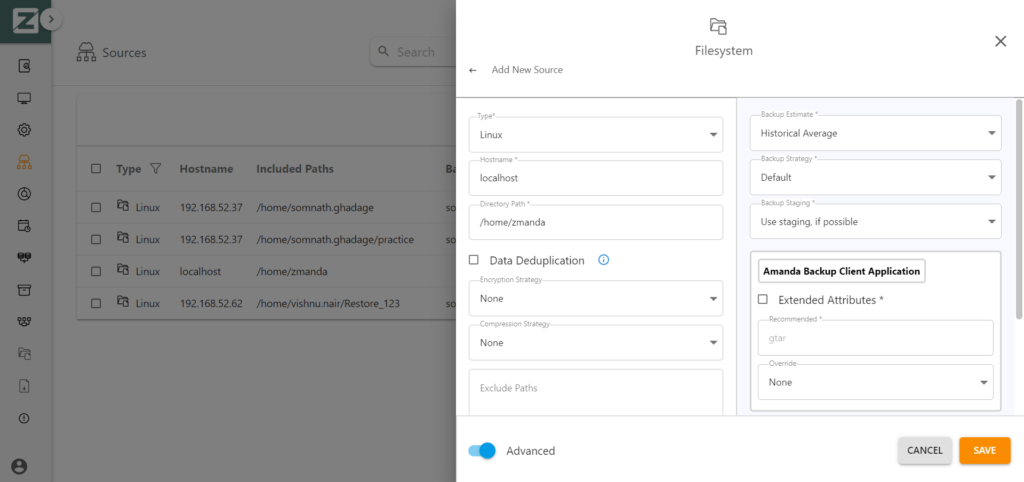
The directory path refers to the path pointing to the filesystem that acts as the source of data. The field pertaining to the Backup Set will be filled on creating a backup set. The procedure for the same is mentioned in the Backup Set creation step. On completion, click the “Save” button for the successful creation of the source.
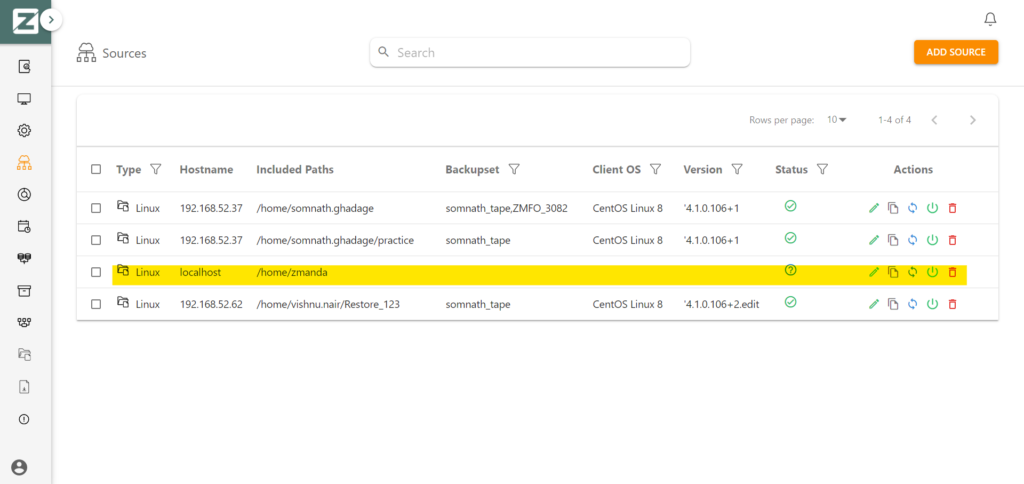
The source with the required directory has been successfully created.
- Database: If the data from a database such as MySQL is to be backed up, the Database tab has to be used to create the respective source.
- Application: If data pertaining to a certain application on the server is to be backed up, the Application tab has to be used to create the respective source.
- HyperVisor: When data from a HyperVisor such as VMWare on your machine is to be backed up, the HyperVisor tab has to be used to create the respective source.
With the sources for data set up, the next step is to create the storage element into which the data is backed up.
3. Creating the Tape Storage
The next step is to create a storage element using the Storage page.
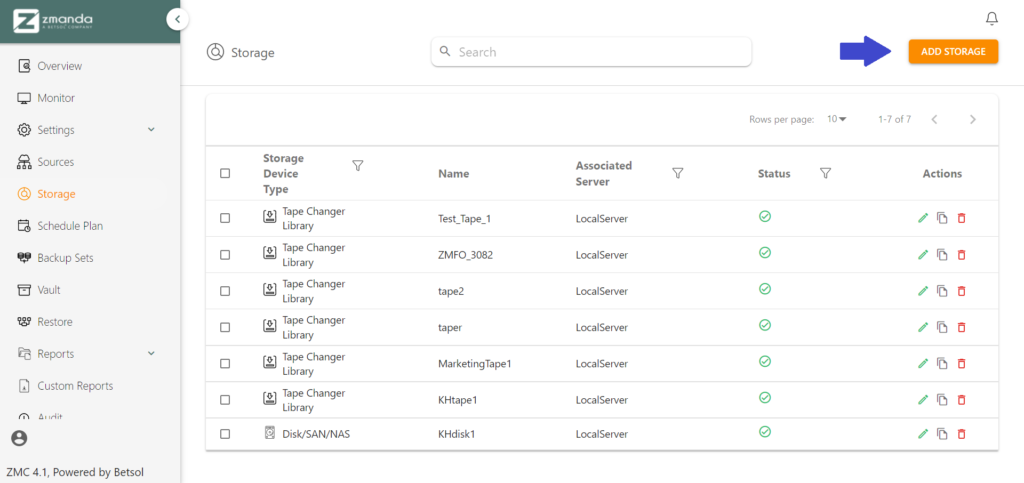
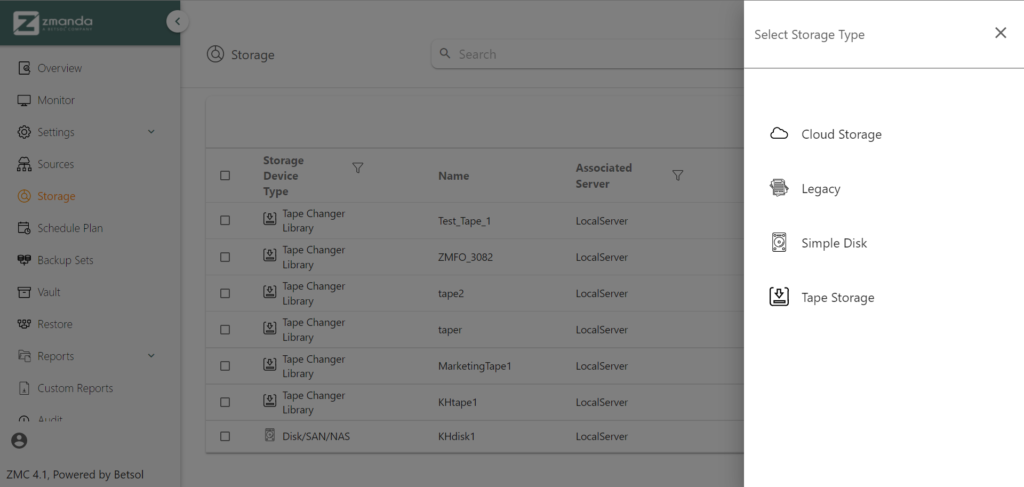
Zmanda supports various storage devices, namely Cloud Storage, Legacy, Simple Disk and Tape Storage. Let us understand how to set up a Tape Storage element from scratch.
Tape Storage
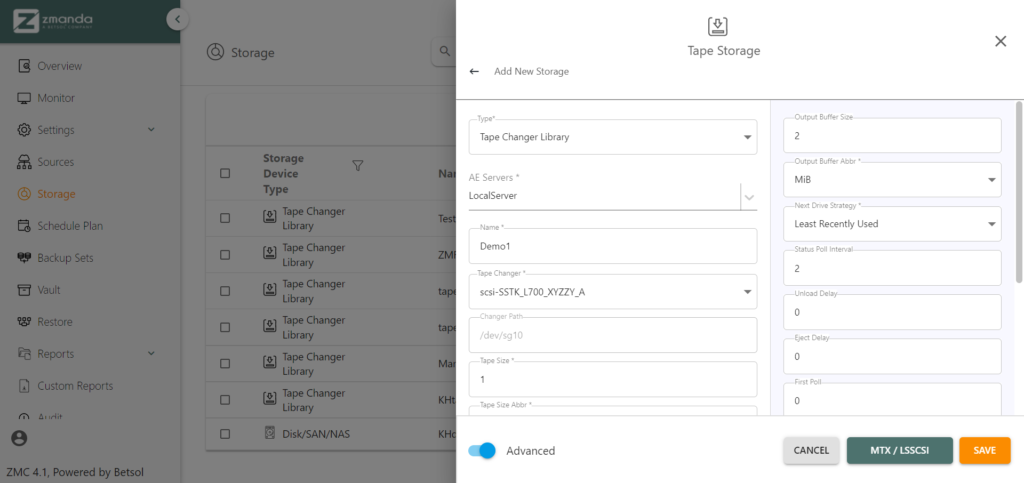
ZMC allows its users to customize their storage devices to fit their requirements in the best way possible. As seen above, there are various fields such as Drive Strategy and Output Buffer Size, that can be changed to meet specifications. In addition, ZMC auto-selects a Tape Changer present in the mentioned server that can be changed as per the user’s requirement.
On completion, click on the “Save” button to create the tape storage element.

Next Drive Strategy
The next drive strategy specifies the algorithm used while shifting tapes to and from the tape drive and storage elements. A tape drive provides storage capacity by working with the physical tape. It can only support the read write functioning of one physical tape at a time.
Zmanda offers two such mechanisms:
1. Least Recently Used: The tape retrieved from the storage element will be placed on the tape drive that had been least recently used for reading or writing.
2. First Available: The tape retrieved from the storage element gets placed on the tape drive that is empty, and immediately available to the tape changer.
4. Setting up a Schedule
ZMC allows our users to backup their data periodically to various devices from different sources as per a user-defined schedule. This can be configured in the Schedule tab.
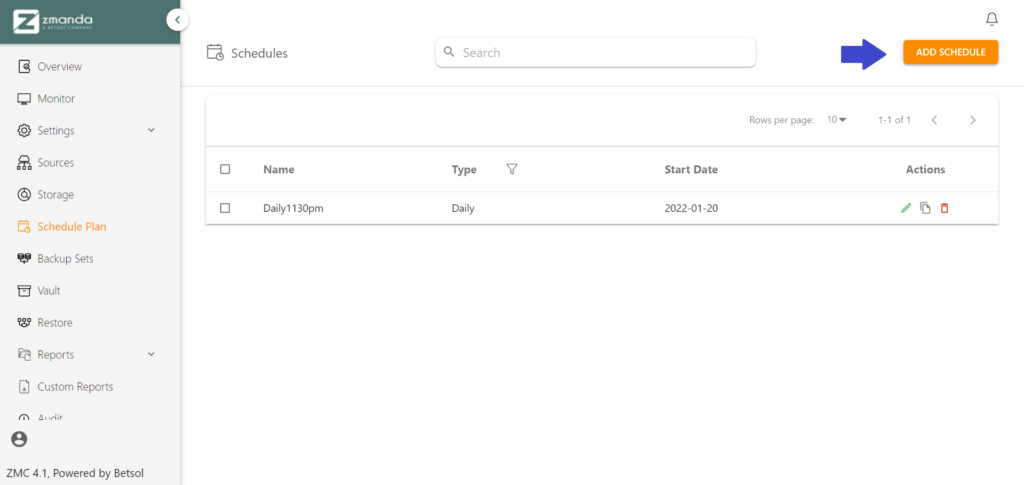
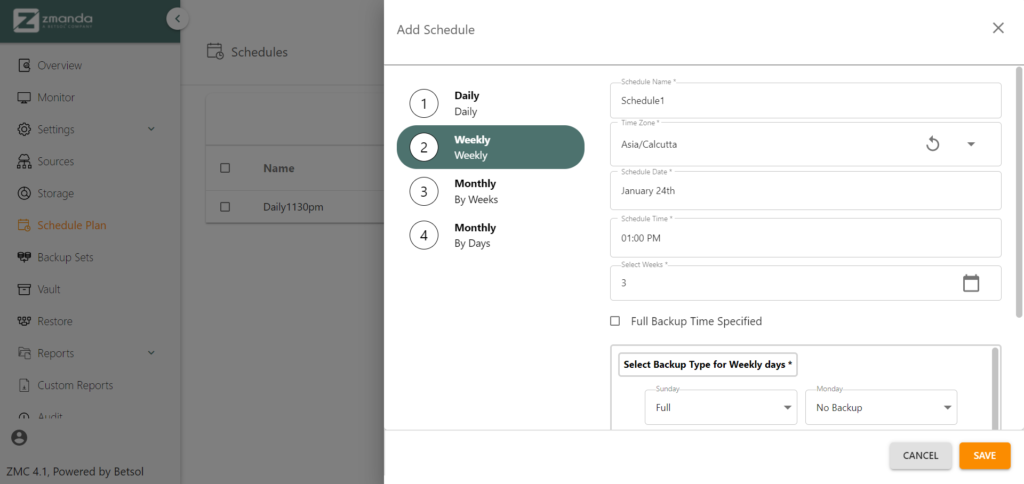
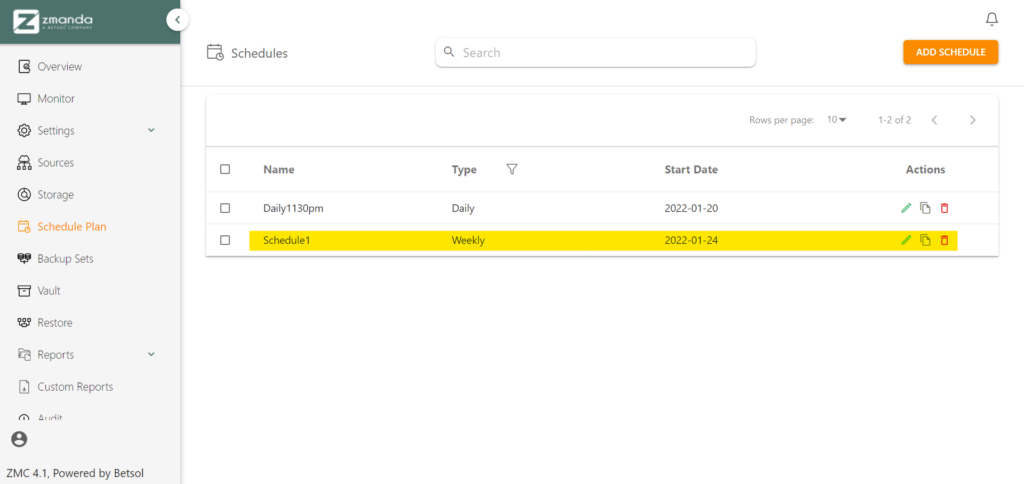
Identify a name for the schedule and fill the fields to customize the schedule to fit your necessities. Click on the “Save” button to successfully create the schedule.
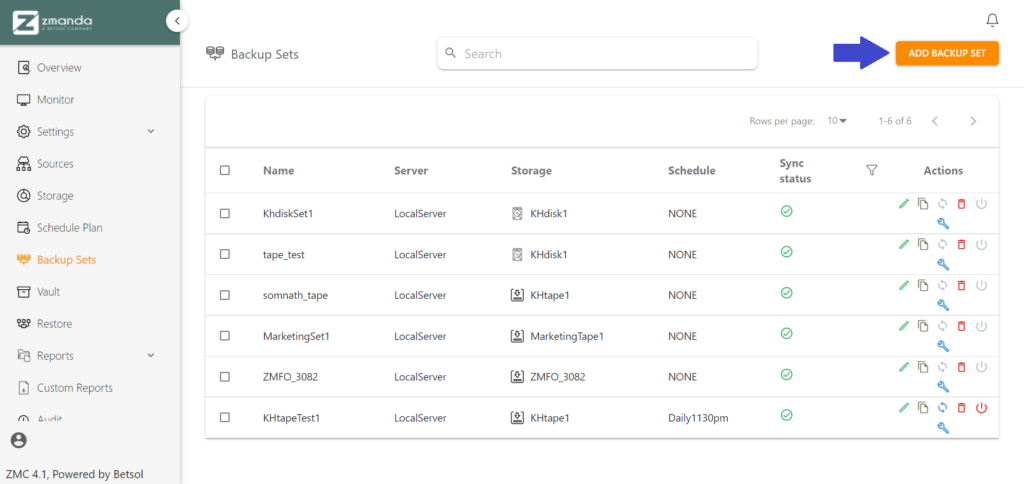
5. Bundling up sources and data into Backup Sets
Our users handle volumes of data that are obtained from numerous sources and have to be backed up periodically and simultaneously. To facilitate this, a Backup Set is created to bundle up the various sources of data or devices to which data should be backed up. Further, the schedule created in the previous step is attached to this backup set.
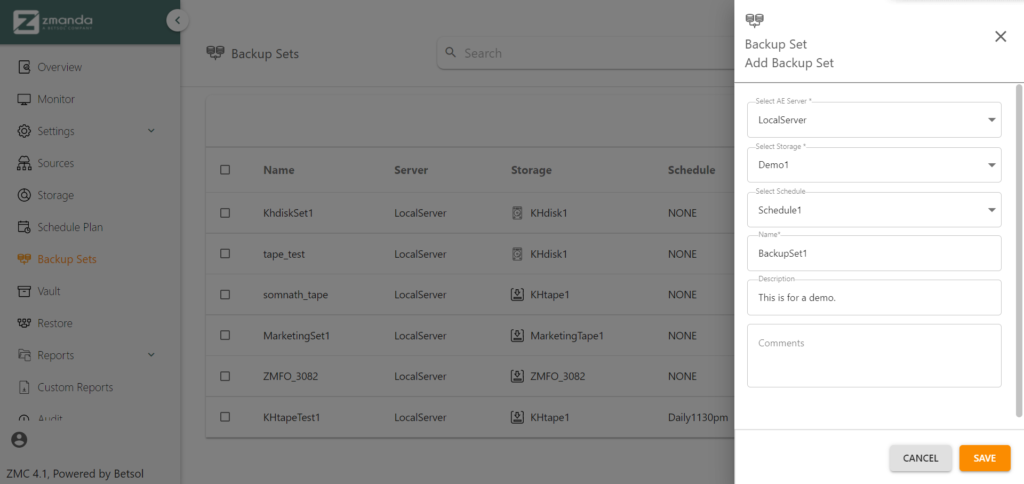
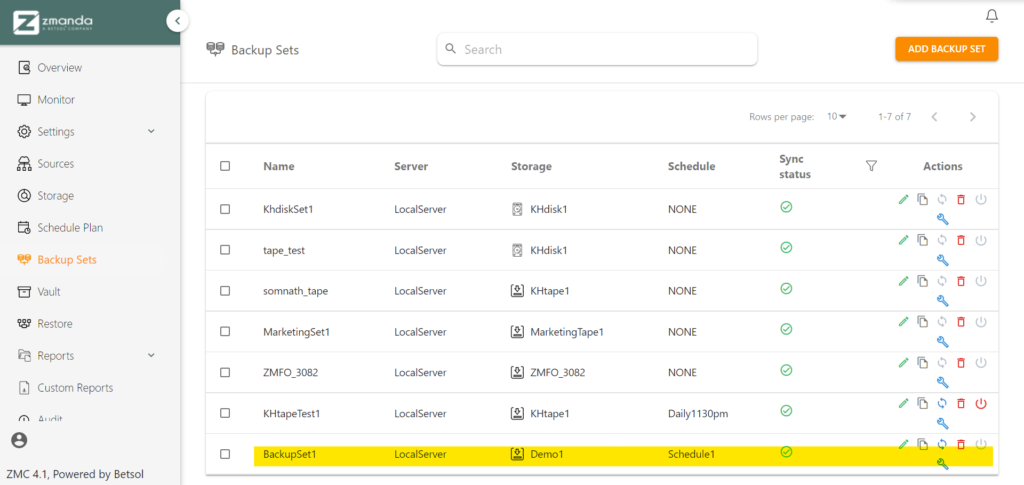
On filling out the details of the backup set, click on the “Save” button to successfully create the backup set.
Once the backup set gets created, you need to associate the backup set to a particular source. To do this, head over to the Sources page and click on the edit icon that you find available next to the source required.
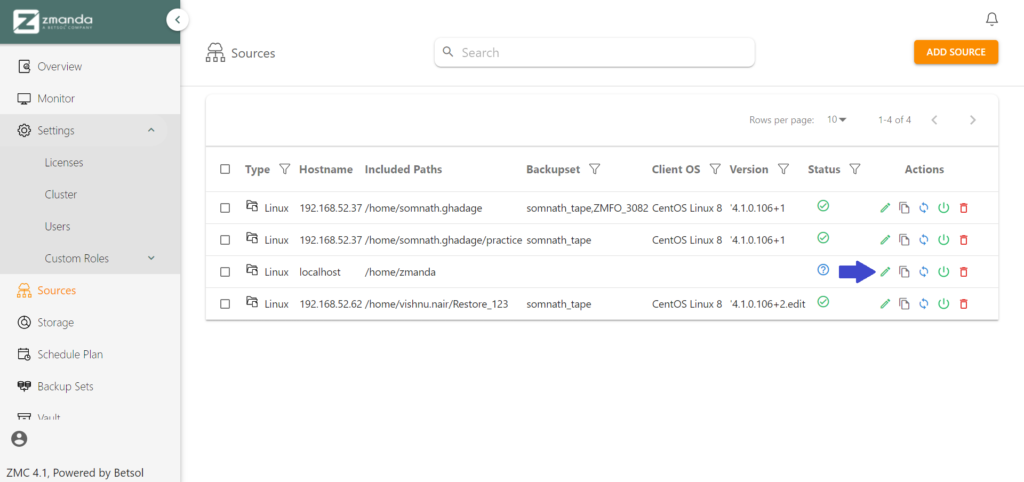

Add the Backup Set created in the previous step to the selected source and click the “Save” button on completion.
Multiple Backup Sets can be linked to the same source.
With the backup set and source linked up, the final step is to configure the backup by tweaking parameters that pertain to the backup method, taper scan etc.
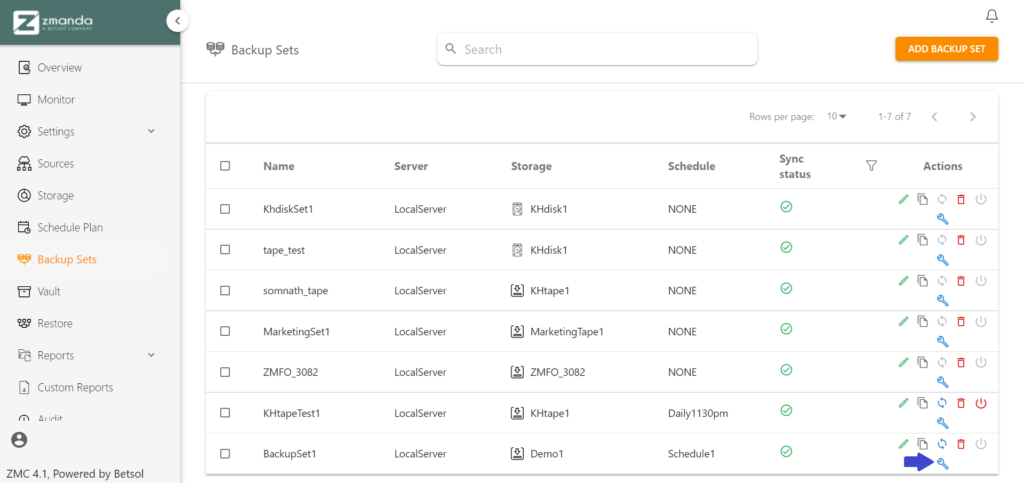
6. Configuring the Backup Sets
Next in line is configuring the created backup set. To do this, head over to the Backup Sets page and click on the configuration icon of the required backup set.
i. Backup What
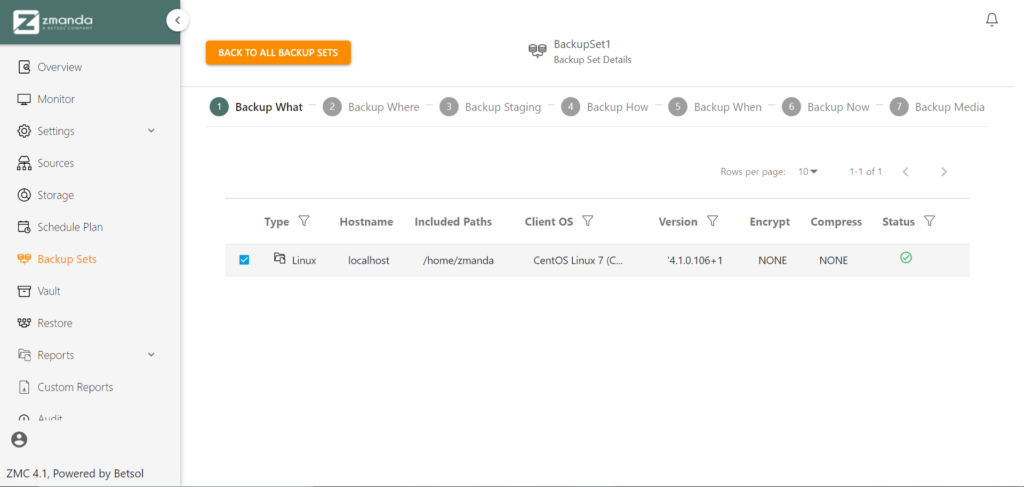
Choose a source that will be associated to the chosen backup set. By default, all sources linked to the backup set will be selected for back up. On choosing the source(s) by selecting or deselecting them, proceed to the Backup Where page.
ii. Backup Where
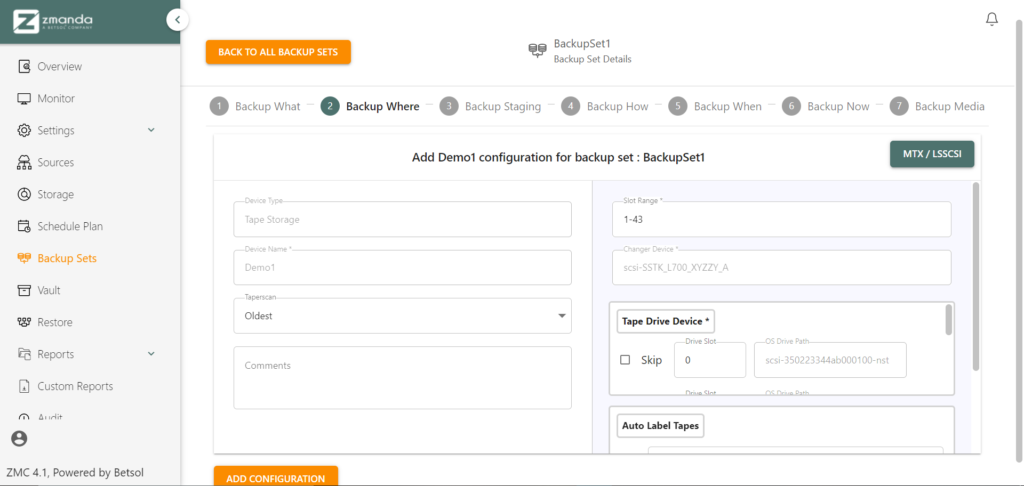
- Zmanda offers 3 modes of Taperscan, namely: Oldest, Traditional and Lexical. To understand the underlying mechanism and algorithm used by the various modes, click here.
- Slot Range: This field indicates the slots with physical tapes which get utilized for the current backup configuration.

For instance, we can allot slots/storage elements ‘5-10’ for this backup. This can be done by mentioning the range 5-10 in the slot range field.
- Tape Drive Device: Zmanda supports backup to take place in parallel. Hence, it is possible to allocate certain tape drives for one particular backup set while another is allocated for a different backup set. Thus, to omit the use of a particular tape drive, select the skip option of the respective tape drive. (Zero-indexing is used)
- Auto Label Tapes: This field allows the user to choose a tape selection method. The method is employed when a tape is selected and placed on the tape drive. Given below are the selection methods provided by ZMC.
Apart from the VolumeTag unique to each physical tape, Zmanda assigns a label referred to as the Amanda label. This label can be changed by the user in the Backup Media stage to facilitate easier identification.
- Only if Amanda label not found: Tapes that are either empty or have data written to them but are NOT associated with Amanda will be selected.
- Only if already labelled for a different backup set: Tapes that were previously associated with a backup set and are no longer required will be selected.
- Only if Empty or i/o Error: Tapes that have no data written on them or have been labelled as the victims of i/o errors will be selected.
- Always: Tapes that are either empty, or associated to other backup sets or have no Amanda label will be selected.
Zmanda recommends its users select the ‘Only if Empty’ or ‘i/o error’ option as the other three options get subjected to overwriting of data which may lead to unintentional loss of data if selected without prior checking and care.
On filling the various fields and choosing the required options, click on the “Add Configuration File” option, and proceed to the Backup Staging page.
iii. Backup Staging
What is staging?
Zmanda uses a location on the server as an intermediate storage location before writing the data to the physical tape. This is referred to as the Staging process.
i.e. Data from source → Data stored in server (Intermediate step) → Data written to the physical tape
Note:
Assume that a tape having a storage capacity of 1.5TB is currently present in a tape drive. If the data backed up is only of size 10GB in size, there is a tremendous wastage of tape storage as the data is written only to the entire tape and not a portion of it. Thus, Zmanda introduced staging to ensure that the cost of storage is commensurate with the amount of utility it provides.
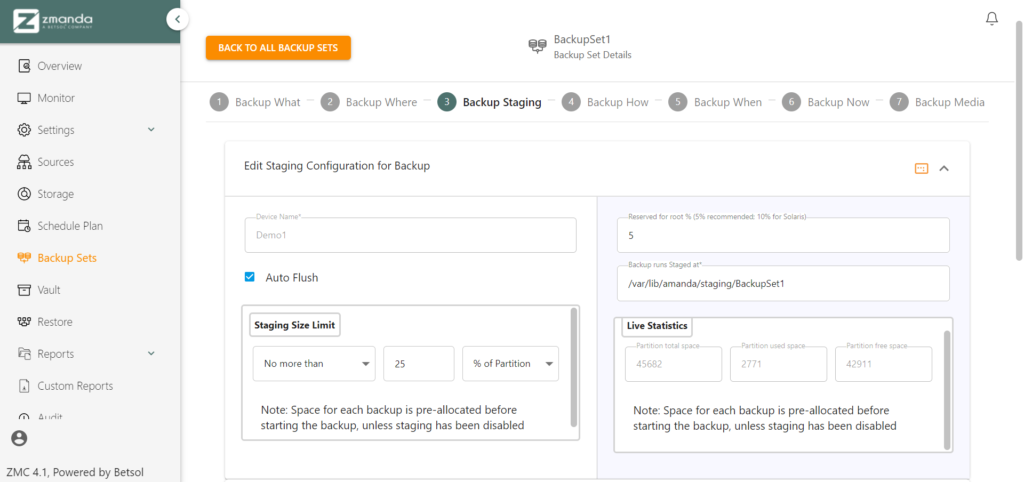
The Backup runs Staged at specifies the directory in which the staging of data takes place, i.e., data is temporarily stored here before being written into the physical tape.
To configure the settings of the staging process, click on “Advanced Options”.
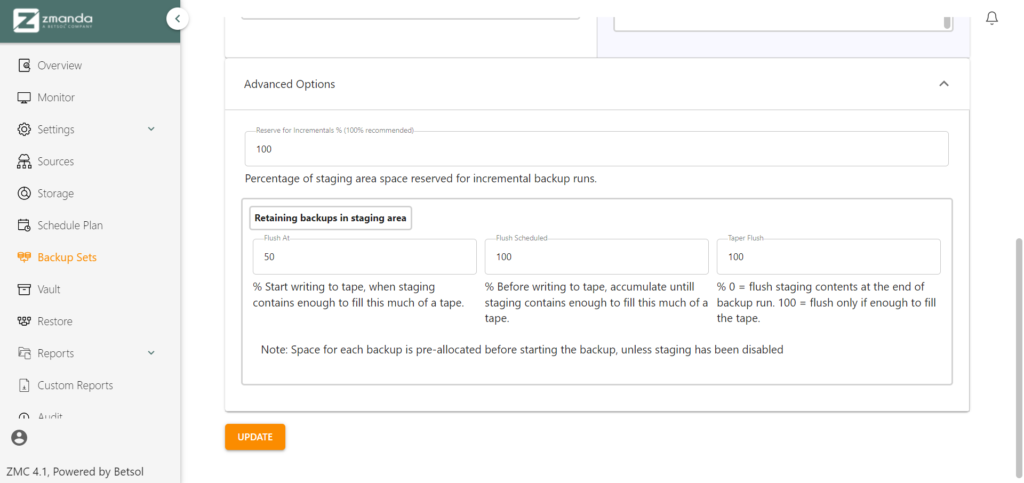
Flushing is the process of transferring data present in the intermediate storage space to the physical tape, the end storage point. As mentioned under the note in “What is staging?”, tape storage is efficiently used by ensuring that sufficient data is backed up and staged before being written to an entire physical tape.
i.e. We can set the flushing to take place only if there is enough data to occupy a minimum of 75% of the tape.
The taper flush parameter can be set to 0 if the data has to be written to the tape immediately, i.e. the staging of data will be skipped. This feature is needed when mission-critical data is backed up, i.e., priceless data will need to be backed up to the tape immediately to minimize data loss that may occur during the staging process.
On completion, click on the “Update” button and receive the successful update confirmation notice. Proceed to the next page —the Backup How.
iv. Backup How
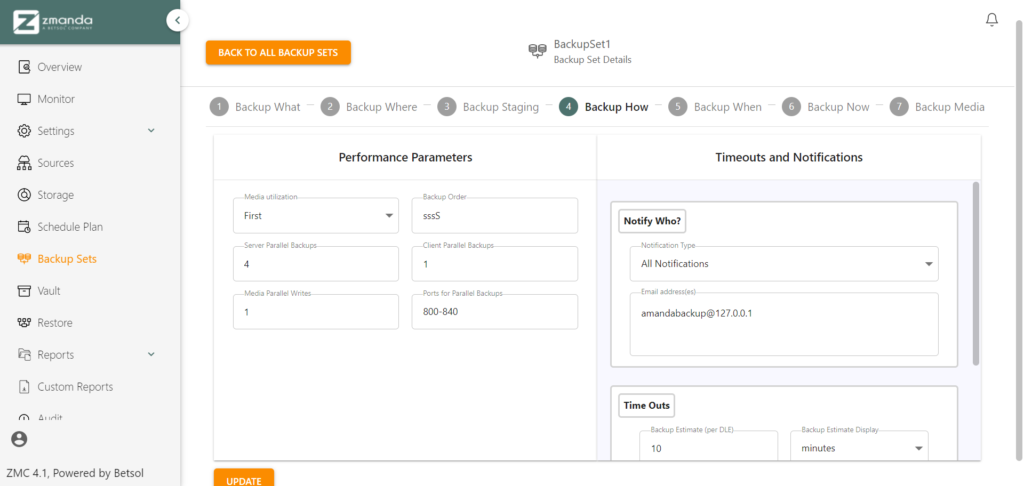
On this page, tweak parameters that pertain to the performance and the parallel backup feature. Notifications can be customized to push alerts to the respective personnel. On the other hand, time outs are used to configure the default waiting period between communications that takes place during the different backup stages.
On completion, click on the “Update” button and proceed to the Backup When page.
v. Backup When
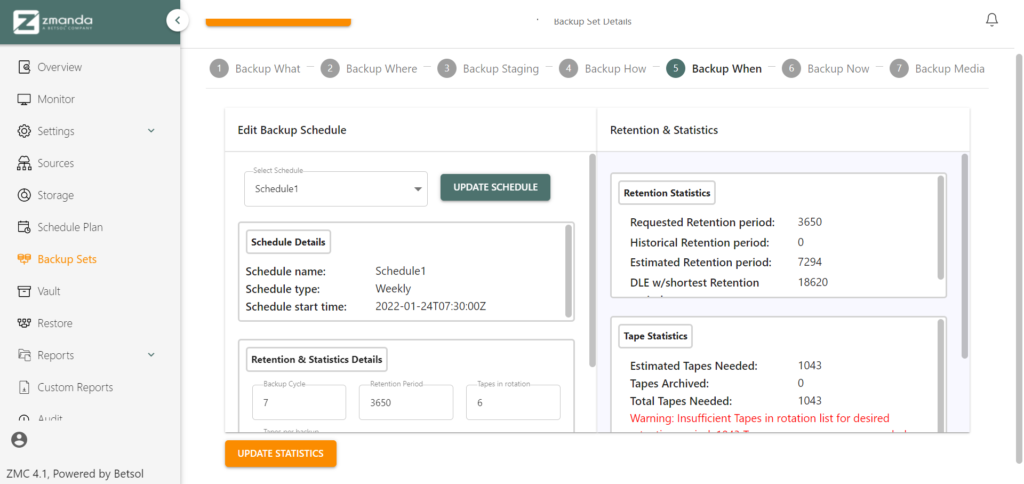
The Backup When page can be used to change the schedule that is already linked to the backup set if required. Retention and tape statistics can be cross-checked to ensure a smooth backup process. This can check all the boxes of the user’s requirements.
On completion and cross-verification, click on the “Update Statistics” button to implement the changes, if any. Proceed on to the Backup Now page.
vi. Backup Now
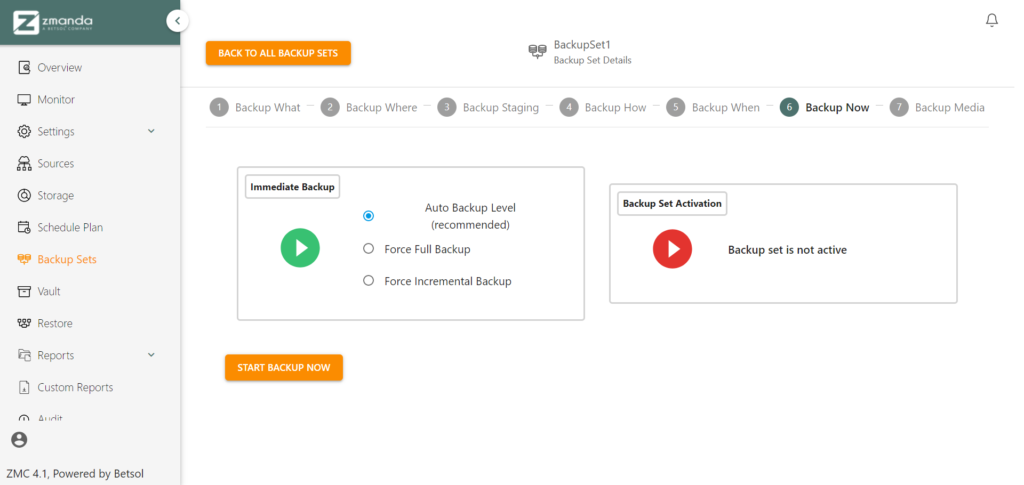
There are two options under the Backup Now page. Immediate Backup option carries out the backup immediately, and it reflects on the monitor page along with the status of the operation.
Backup Set Activation helps you commence the periodical backup as per the specified schedule. Click on the Red icon to activate the backup set.
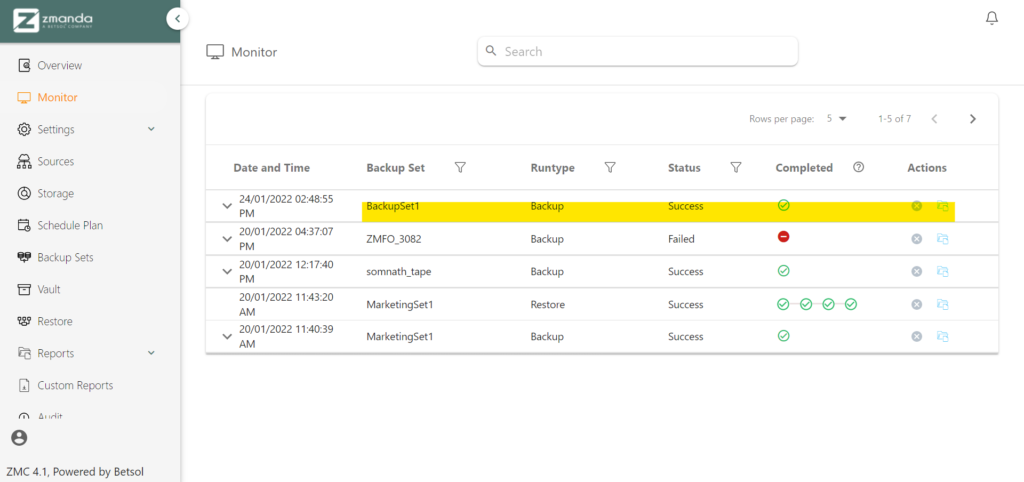
On choosing the Immediate Backup option, the backup process has taken place successfully, and this can be viewed on the Monitor page.
With everything set, proceed to the Backup Media page.
vii. Backup Media
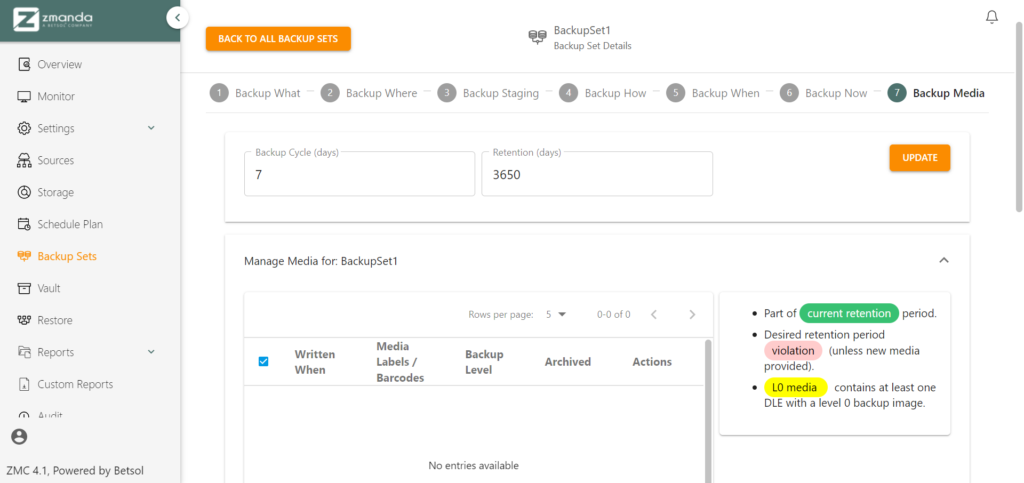
As mentioned previously, the Amanda label allocated to a tape can be changed in this page. The immediate backup performed hasn’t been listed as it is yet to be written to the tape. This is due to the staging conditions that we have previously set. To view a detailed report on the immediate backup or for other scheduled backups, go to the Reports page.
7. View detailed Reports
The ZMC report for the completed backups or staging processes can be obtained under the Reports page.

Further details of a completed task can be viewed by expanding the task in question.
Step 5: Sit Back and Monitor Data Backup
You have successfully scheduled a backup and configured it to meet your needs. All that’s left is to sit back and monitor the data backup using ZMC Reports and the Monitor page when required. ZMC offers all the details you’ll need in an organized and detailed manner, leaving no room for confounding. With ZMC’s ability to provide staging, various tape selection methods and easy configuration, Zmanda ensures that our clients are given a fool-proof data backup customization tool.
And there you have it, a simple 5 step process to configure your data backup using tape libraries with Zmanda. For further queries and assistance, reach out to our experienced IT Admin and staff by clicking here.
FREE eBook
Tape Backup for Dummies
The Ultimate Guide to Seamless
Data Storage and Archival