This article introduces you to an important element of Zmanda, called backup sets. It covers how to create a backup set and configure it to the media of your choice.
Backup sets offer more scaffolding by creating an isolated data boundary that groups sources, storage, and timing templates together. A backup set groups the sources you want to backup in parallel and creates a virtual data boundary to separate data between backup sets.
The single backup set might suffice when you want to back up one or two servers to one destination. Multiple backup sets are helpful for configurations where 100's systems have different backup requirements.
This framework simplifies backups of 100's of endpoints, where different groups have different backup requirements. For example, suppose you have a network that includes servers with a high rate of data change and desktop systems that change data more slowly. In such a scenario, you would want to create one backup set for the servers and another backup set for the desktops.
All operations, such as backup, restore, reporting, monitoring, etc., are performed within the context of a backup set. You can easily create and configure backup sets in Zmanda to start backing up crucial data in your organization.
Create Backup Sets in Zmanda
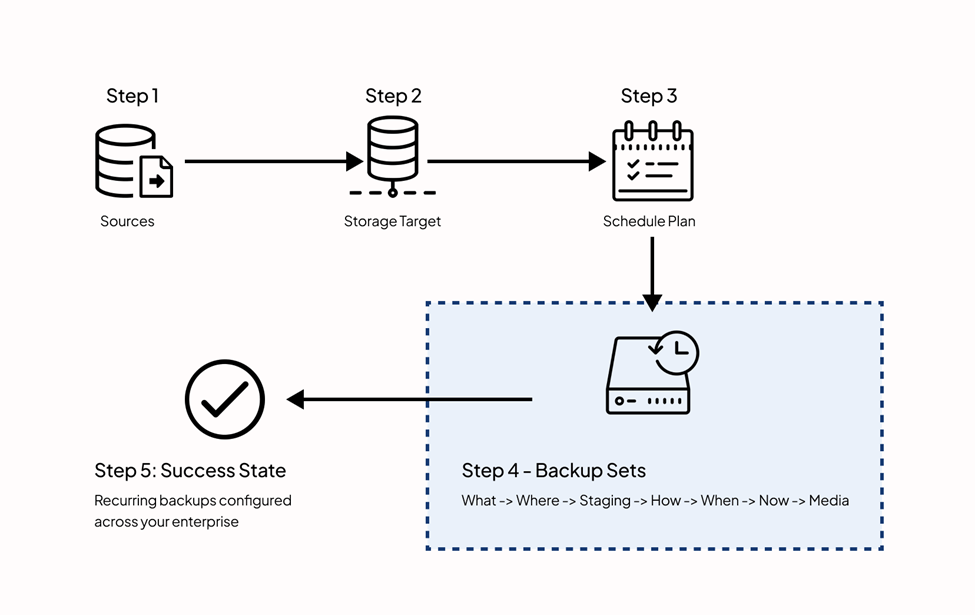
Once the backup server is running and the backup agent is installed on the source to backup, the next step is to create the backup sets. As the backup set groups sources, storage, and schedule plans, it is essential to configure these three before creating a backup set.
The source defines what to backup, storage defines the storage destination, and the schedule plan defines the interval at which a backup happens. If you have not yet created sources, storage, and schedule plan, please refer to our detailed documentation to create them.
To create the backup set, log in to ZMC and click on Backup Sets in the side menu. This takes you to the overview screen, where all your backup sets are listed.
Now, click on the Add Backup Set button on the top right, and you will see a side panel with the below fields.
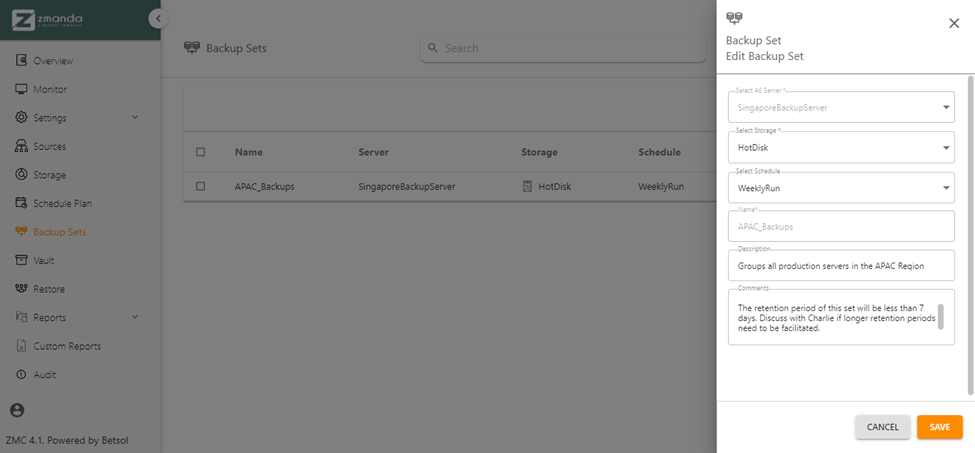
Select AE Server: With this field, you can select a backup server that will run the backups. The servers listed here are all the backup servers linked to the ZMC cluster feature.
Select Storage: This field allows you to select a storage device where you want to save your backups.
Select Schedule: You can configure the backup window in which the backups should run by selecting the right schedule plan for your backup runs.
Name field: You can specify a unique name for the backup set in the Name field. Alphanumeric characters are permitted, with no spaces, and the characters cannot exceed more than 255 characters.
Description field: Description is optional. It serves as a reminder as to what type of backups are included or where it is configured.
Comments textbox: Operational or maintenance notes can be added in the comments.
Once all the details are added, click on Save to create a backup set.
Configure Backup Sets in Zmanda
Configuring backup sets is a 7-step process. Well, let’s not panic here, as the steps are easy to follow.
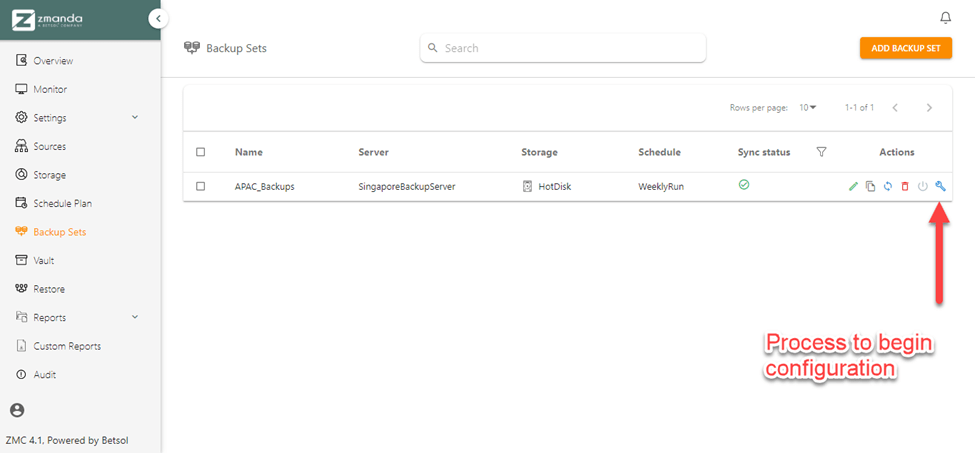
Now, to start the configuration, click on configure icon of the backup set you just created. And follow the steps given below.
Step 1: Backup What
In this phase, you define the sources you want to back up.
Step 2: Backup Where
It displays the storage destination, which will store all the data generated by the sources. You can configure the storage medium of your choice in this step.
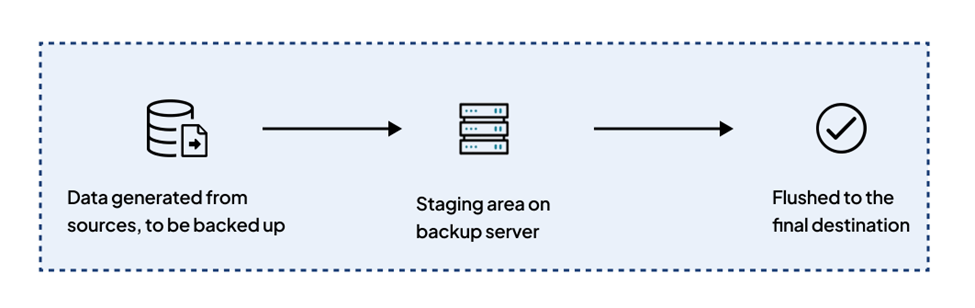
Step 3: Backup Staging
Zmanda lets you define a scratch disk, which temporarily stores the backups on the server's hard disk. In this step, you need to add all the staging-related details for your backups.
Step 4: Backup How
It lets you define critical internal parameters that control how the backup set will run after it has been activated.
Step 5: Backup When
In this step, you select the frequency of the backup runs by linking the backup set to the appropriate Schedule plan you created in Step 3.
Step 6: Backup Now
The final screen lets us start the backup run on the backup set. If it's the first time you run the backup set, we recommend triggering an immediate backup using the green play button.
Step 7: Backup Media
Under the manage media, you can specify the backup cycle and retention period in days.
-
The backup cycle specifies how often Zmanda should run a full backup.
-
The retention period defines how long a backup should be retained in the storage set, post which ZMC will prune it.
For detailed instructions on each step, please refer to our documentation on Backup Sets.
Let’s Start Backing Up Your Data Now
You can now create different backup sets for different sources and run them whenever you want. If you wish to restore your data, please refer to our guide on the restoration process. However, if you have just opted for a free trial, our quick start guide on the free trial package can help you with the installation, backups, and restores on Zmanda. In case of any troubles with configurations, feel free to contact the Zmanda support teams. Our team of experts will be happy to help!